Quest 3 best settings are less about a single graphics slider and more about matching the headset to your eyes, your play space and how you move. On standalone Quest apps, refresh rate is chosen by each developer. On PC VR via Meta Horizon Link or Air Link, you set refresh rate and render resolution in the PC app. This guide covers the settings that actually change clarity and comfort, checked against Meta’s Help articles and developer documentation on November 5, 2026.
If you are still unboxing, start with our Quest 3 and 3S setup guide. For battery trade-offs after you tune display and power options, see the Quest 3 battery life guide.
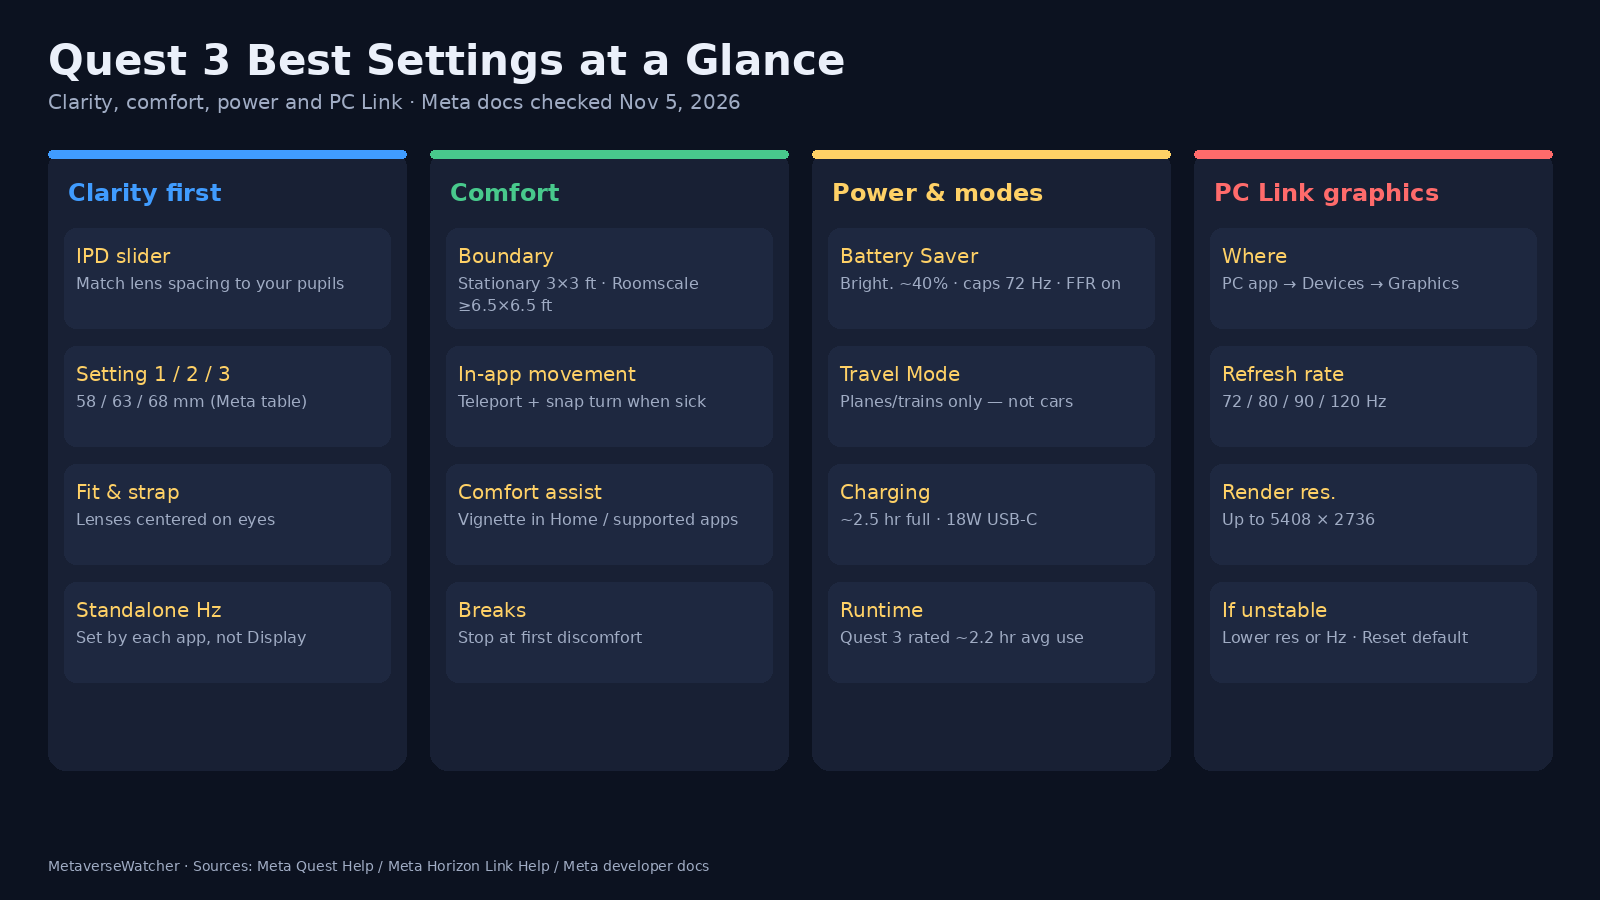
The short version
- Set lens spacing (IPD) with the slider under the headset before chasing software tweaks.
- Standalone apps control their own refresh rate; the old Display refresh menu is for Link/Air Link sessions, not every Quest Store title.
- For PC VR, open the Meta Horizon Link app → Devices → active headset → Graphics preferences to set 72 / 80 / 90 / 120 Hz and render resolution (max 5408 × 2736).
- Use Battery Saver when you need longer sessions; Meta’s developer docs describe lower brightness (~40%), a 72 Hz cap and fixed foveated rendering.
- Redraw Boundary for the play style you need: Stationary is about 3 × 3 ft; Roomscale should be at least 6.5 × 6.5 ft cleared space.
| Goal | Setting to change | Where |
|---|---|---|
| Sharper image for your eyes | Lens spacing / IPD | Physical slider under the headset |
| Safer play area | Boundary mode and redraw | Quick controls → Settings → Environment setup → Boundary |
| Longer runtime | Battery Saver | Quick settings / Power |
| PC VR smoothness vs clarity | Refresh rate and render resolution | Meta Horizon Link PC app → Graphics preferences |
| Less motion discomfort | Teleport, snap turn, comfort assist | Home World Movement and each app’s comfort menu |
Clarity: IPD and physical fit come first
Meta’s IPD and lens spacing help article is the right starting point for a soft or “swimmy” image. Interpupillary distance is the space between your pupils. Lens spacing is the distance between the clearest spots on the lenses. Clarity improves when those line up. Meta says Quest headsets best accommodate IPDs between 56 and 70 mm, covering about 95% of adults.
On Quest 3, gently move the slider under the headset until the view is clear and comfortable. If you know your IPD, Meta’s suggested lens spacing settings are:
| Your IPD | Suggested lens spacing |
|---|---|
| 61 mm or smaller | 1 (narrowest, 58 mm) |
| 61 mm to 66 mm | 2 (middle, 63 mm) |
| 66 mm or larger | 3 (widest, 68 mm) |
Also check strap tension and vertical position. Pancake lenses punish a headset that sits too high or too low; many “blurry Quest 3” complaints are fit problems, not missing software toggles. Prescription lens inserts can help if you wear glasses; our VR prescription lens inserts guide compares options by headset.
Refresh rate and render resolution: standalone vs PC Link
Quest 3’s panel supports high refresh rates, including 120 Hz, and Meta’s developer docs list additional rates apps can request on Quest 3 hardware. That does not mean every Store title exposes a user toggle. Meta Store Support has stated that changing refresh rate under headset Settings → Display is no longer how standalone apps work: each app’s developer sets the rate for a stable experience. Looking for 72 / 90 / 120 Hz only in the headset Display menu, then finding nothing while untethered, is expected behavior.
PC VR is different. Meta’s Horizon Link troubleshooting article documents Graphics preferences in the Meta Horizon Link app on Windows:
- Open the Meta Horizon Link app on your computer.
- Click Devices, then your active headset.
- Scroll to Graphics preferences.
- Adjust Refresh rate and Render resolution, then Save.
Meta lists refresh rate options of 72 Hz, 80 Hz, 90 Hz or 120 Hz, and says render resolution can go as high as 5408 × 2736. Higher values look sharper and smoother when your GPU can sustain them. If frames drop, lower resolution first, then refresh rate. Use Reset to default in the same panel if Link becomes unstable. For wired versus wireless trade-offs, see how to play PC VR games on Quest 3.
| Context | Who controls Hz / resolution | Practical takeaway |
|---|---|---|
| Standalone Quest apps | App developer | No global Display refresh toggle for all Store titles |
| Meta Horizon Link / Air Link | You, in the PC app | Pick 72–120 Hz and a render resolution your GPU can hold |
| Battery Saver on | System power mode | Refresh capped at 72 Hz while the mode stays on |
Comfort: Boundary, movement and when to stop
Clarity without a safe play area is incomplete. Meta’s Boundary help article defines two modes:
- Stationary: sitting or standing in place; default about 3 × 3 feet (1 × 1 m) centered on you.
- Roomscale: move inside a drawn play area; Meta recommends at least 6.5 × 6.5 feet (2 × 2 m) of clear space.
Path: Meta button → Quick controls → Settings → Environment setup → Boundary → Create new boundary. You can also switch to Roomscale from Quick controls → Boundary while in an app. Floor level, boundary color, stationary size, glanceable boundary and sensitivity live in the same Boundary settings. Choose the play style that matches the title; our comparison of seated vs standing vs room-scale VR walks through that decision.
Movement comfort is often app-specific. Meta’s locomotion design guidance treats teleportation and snap turning as the comfort options, with smooth locomotion and smooth turning as the immersive options that can provoke more visually induced motion sickness. In Horizon Home, look for World Movement settings (teleport vs walk, snap vs smooth turn, comfort assist / vignette). Inside games, open each title’s settings and prefer teleport, snap turn and any vignette or comfort mode until you build tolerance. If you feel sick, stop; our VR motion sickness prevention guide covers session length and recovery habits.
Battery Saver, Travel Mode and related power choices
Meta rates Quest 3 at about 2.2 hours of average use. Demanding mixed reality or high-load games can fall short of that. Battery Saver extends runtime by reducing power draw. Meta’s developer documentation describes the mode as reducing display brightness toward about 40%, enabling fixed foveated rendering (level 3), lowering display refresh rate to 72 Hz, and limiting certain CPU/GPU boosts. End-user help surfaces the toggle from Quick settings (clock on the universal menu) → Turn on battery saver, and from Power settings. Expect softer visuals while it is on; turn it off when you want maximum fidelity and have charge to spare.
Travel Mode is a separate comfort and safety feature for airplanes and trains. Meta says not to use it in a car. Toggle it from Quick controls. Boundaries do not work the same way while traveling, so pick low-movement content and stay seated. Stowing the headset for takeoff and landing remains the safer habit.
A practical settings checklist
- Measure or estimate IPD; set the under-headset slider to Meta’s matching 1 / 2 / 3 position and recenter the strap.
- Create the Boundary that matches today’s activity; redraw after you rearrange furniture.
- For standalone play, install updates, then set comfort options inside each app rather than hunting a global 120 Hz switch.
- For PC VR, start Link at 90 Hz and a moderate render resolution; raise toward 120 Hz or higher resolution only while frame time stays stable.
- Enable Battery Saver for long media or casual sessions; disable it for competitive or clarity-critical play.
- Use Travel Mode only on planes or trains, never in a car.
- Keep controllers charged and tracking clean; drift and lost tracking feel like “bad settings” but are hardware/tracking issues—see our Quest 3 controller drift and tracking fix.
Related coverage
- How to set up Meta Quest 3 and 3S
- Quest 3 battery life guide
- Seated vs standing vs room-scale VR
- How to prevent VR motion sickness
- How to play PC VR games on Quest 3
- Meta Quest 3 vs Quest 3S (2026)
Sources
- Meta: Learn about IPD and lens spacing on Meta Quest
- Meta: Set up your boundary for Meta Quest
- Meta: How to troubleshoot Meta Horizon Link (Graphics preferences)
- Meta: How to use travel mode on Meta Quest
- Meta: How to charge your Meta Quest headset
- Meta developers: Battery Saver mode
- Meta developers: Render scale
Settings menus move between Horizon OS updates. If a path above does not match your build, use Settings search for the feature name (Wi-Fi, Battery Saver, Boundary, Travel mode) — Meta added settings search in a prior release notes drop.