If your Meta Quest looks slightly blurry, gives you eye strain after twenty minutes, or never feels quite “locked in”, the cause is often lens spacing, not resolution. The fix takes seconds once you know your IPD (interpupillary distance) and how your headset adjusts. This guide covers the Quest 3 and Quest 3S, which use different systems. The 3S approach also applies to the Quest 2.
IPD vs lens spacing: what you are actually adjusting
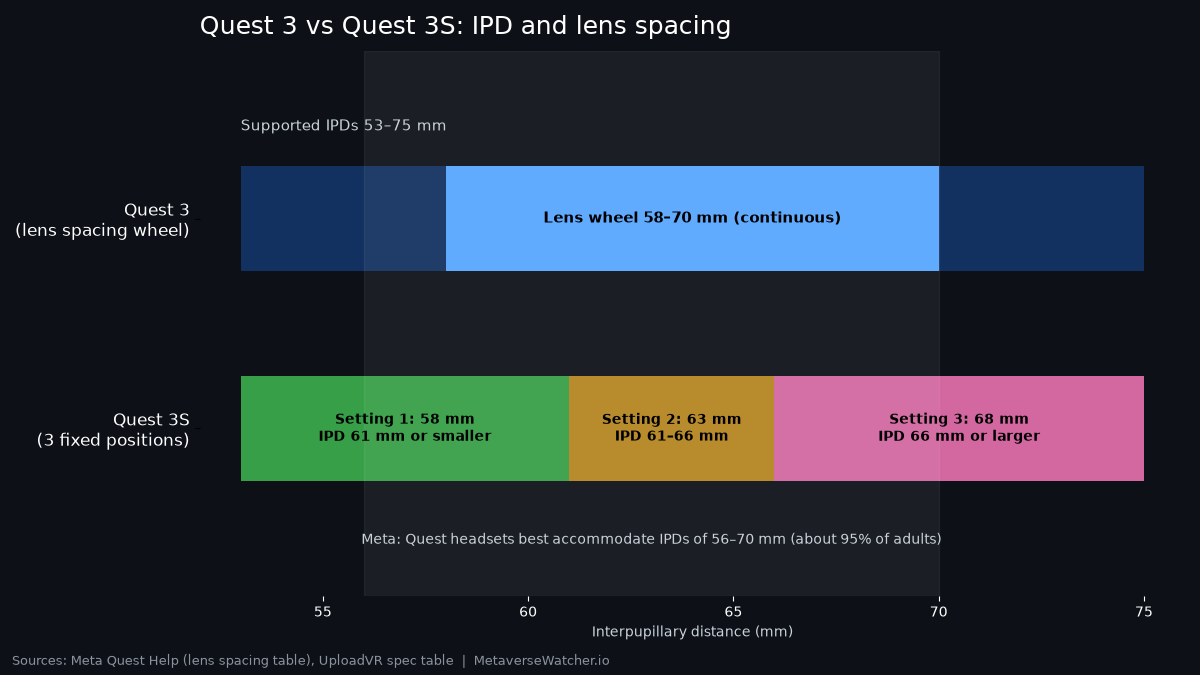
Meta’s help center separates two terms. IPD is the distance between your pupils. Lens spacing is “the distance between the clearest spots on the two lenses inside your headset.” For the sharpest image, Meta says the two should line up as closely as possible. It also says Quest headsets “best accommodate IPDs between 56 and 70 mm, or about 95% of adults” (Meta Quest Help).
When the lenses are misaligned with your eyes, you look through the softer outer part of each lens. Text blurs, edges show more glare, and your eyes work harder to fuse the two images. That last effect is a common source of headaches and can make VR motion sickness worse.
Step 1: Measure your IPD
An optometrist’s measurement is the most accurate, and it is often already on your glasses prescription as “PD”. If you don’t have it, Meta suggests a mirror-and-ruler method:
- Stand in front of a mirror and hold a millimeter ruler just above your eyes.
- Close one eye, then line up the ruler’s zero mark with the center of your open eye’s pupil.
- Without moving the ruler, open the closed eye and close the other. Read the millimeter mark under the center of that pupil.
- Repeat two or three times and average the results. A friend measuring for you is more reliable.
Android Central notes that the average adult IPD sits around 63 mm, with a typical range of roughly 55 to 72 mm (Android Central).
Step 2: How to adjust IPD on Meta Quest 3
Quest 3 has a lens spacing wheel on the bottom-left of the headset. Meta’s setup guide says to turn it “until the visuals in the headset are clear and visually comfortable to see” (Meta setup guide).
- Put the headset on and tighten the straps first. A headset that sits too low or too high changes what looks sharp.
- Open a screen with fine text, such as the Settings menu or a browser page.
- Close one eye at a time and turn the wheel slowly in one direction, then the other. Stop where text is sharpest for both eyes and the image feels effortless.
- If you know your IPD, start near that value and fine-tune by eye. Quest 3’s lenses move continuously from 58 to 70 mm, and UploadVR lists the supported IPD range as 53 to 75 mm (UploadVR spec table).
Don’t skip eye relief. Quest 3 also has depth adjustment buttons inside the facial interface. With the headset off, tilt the arms up, hold the button on one side and slide the interface forward or back. Then repeat on the other side so both match. Meta describes this as setting how far the lenses sit from your face or eyeglasses.
Step 3: How to adjust IPD on Meta Quest 3S (and Quest 2)
Quest 3S has no wheel. It reuses the Quest 2’s three-position system: you physically slide the lenses together or apart. Hold the outer edge or gray surround of a lens, never the glass itself, and gently push.
| Your IPD | Quest 3S lens setting | Lens spacing |
|---|---|---|
| 61 mm or smaller | Setting 1 (narrowest) | 58 mm |
| 61 mm to 66 mm | Setting 2 (middle) | 63 mm |
| 66 mm or larger | Setting 3 (widest) | 68 mm |
According to Android Central, the 3S ships at setting 2, which suits the average IPD. If you fall between presets (say, 60–61 mm or 66 mm), you can try gently resting the lenses between two click points. Android Central reports that this helps some users, but the hardware’s range still tops out at 58–68 mm. It also warns that people with IPDs above about 72 mm will probably find the 3S uncomfortable.
Quest 3 vs Quest 3S at a glance
| Quest 3 | Quest 3S | |
|---|---|---|
| Adjustment type | Continuous wheel | 3 fixed positions |
| Lens spacing | 58–70 mm | 58 / 63 / 68 mm |
| Supported IPDs (UploadVR) | 53–75 mm | 56–60, 61–65, 66–70 mm |
| Lens type | Pancake | Fresnel |
| Glasses support | Eye-relief adjustment | Included spacer |
If you share a headset with family members whose IPDs differ by several millimeters, the Quest 3’s wheel is a real practical advantage. It is one of the reasons we lean toward it in our Quest 3 vs Quest 3S buying guide.
Still blurry? Check these next
- Headset position. Every lens has a sweet spot. Tilt the headset up or down on your face and tighten the top strap so it doesn’t slide.
- Dirty lenses. A smudge looks exactly like bad IPD. Follow our Quest 3 lens cleaning guide before you adjust anything else.
- Glasses vs inserts. If you wear glasses inside the headset, you may be sitting too far back for a sharp view. Prescription inserts are the alternative. See our VR prescription lens inserts guide.
- Software settings. Refresh rate and resolution settings also affect clarity. Our best Quest 3 settings for clarity and comfort covers them.
Quick answers
Do I need to change IPD for each person? Yes, ideally. On Quest 3 it is a quick turn of the wheel. On Quest 3S, slide to the matching preset.
Can I set IPD in the software? On Quest 3 and 3S, lens spacing is a physical adjustment. You set it on the hardware, not in a menu.
Is a slightly wrong IPD harmful? Meta’s guidance focuses on clarity and comfort. If you feel strain, headaches or discomfort, stop, take a break and readjust. New owners should also run through our Quest 3 setup guide to get fit and boundary right from day one.