By the Metaverse Watcher newsroom. Published Sunday, November 22, 2026. Every step below was checked against Valve’s official Steam Frame documentation on November 22, 2026. We will update this guide when Valve changes the setup flow.
This Steam Frame setup guide takes a new headset from the box to your first game, either standalone or streamed from a PC. Valve’s in-headset Guided Tour handles most of the work, but a few steps catch new owners out: the headset will not turn on until it is plugged in, the power supply is sold separately, and full PC streaming support through the wireless adapter is currently limited to Windows.
The instructions come from Valve’s Steam Frame Feature and Troubleshooting Guide, its Steam Frame LEDs reference, the Steamworks developer setup notes and the official Steam Frame spec sheet. Valve also publishes walkthrough videos for unboxing, fit and comfort, and IPD adjustment on its Getting Started with Steam Hardware page.
What You Need Before You Start
Valve’s quick start video lists the box contents as the headset, two controllers, an eye relief spacer, the wireless adapter, an information booklet and a USB-C cable. A power adapter is not in the box. Valve sells a 45W supply separately, and our Steam Frame specs and price guide covers the accessories and their prices.
| Requirement | What Valve specifies |
|---|---|
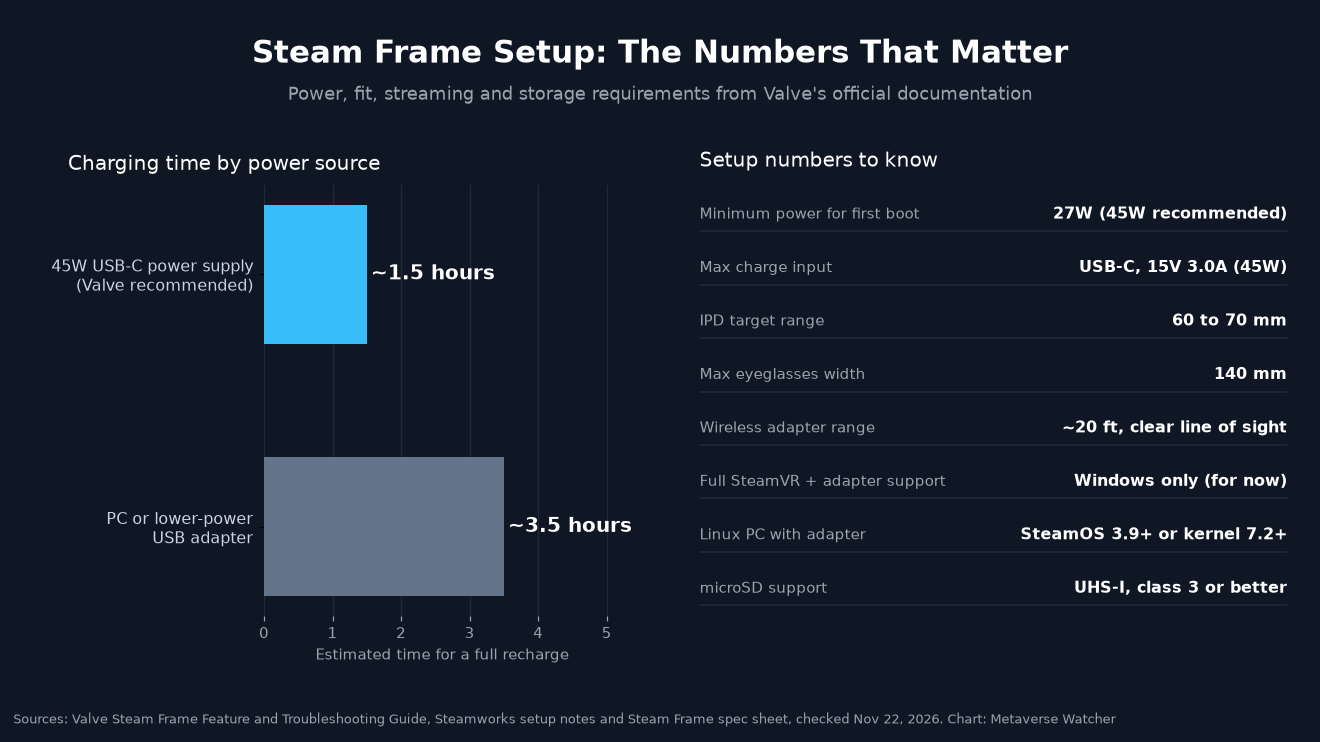
| Power adapter | USB-C, at least 27W; 45W recommended. Charge input is 15V 3.0A (45W max). |
| Steam account | Required. You can create one free on a PC or phone, or during setup. |
| Wi-Fi network | Needed during setup to sign in and download updates. The headset uses built-in Wi-Fi 7. |
| Steam Mobile App | Optional, but Valve recommends it for the easiest sign-in. |
| PC for streaming | Steam and SteamVR installed, a free USB port for the adapter (USB 3 preferred). Full support is Windows only for now. |
| Controller batteries | One AA per controller. Remove the battery tab before first use. |
Sources: Valve Steam Frame Feature and Troubleshooting Guide, Steamworks setup notes and Steam Frame spec sheet, checked November 22, 2026.
Step 1: Plug In the Headset First
Valve says the Steam Frame “arrives in a battery-saving shipping mode” and must be plugged into power through the USB-C port on the rear headstrap before it will power on. The Steamworks notes add that the adapter should supply a minimum of 27W, with 45W recommended. Hold the power button until the LED turns white.
Valve estimates a full recharge at about 1.5 hours with a compatible 45W supply and about 3.5 hours when charging from a PC or another USB adapter. The headset LED tells you what is happening:
| Headset LED | Meaning |
|---|---|
| White, solid | Powered on |
| White, solid, dim | Charging |
| Green, solid, dim | Fully charged |
| Yellow, solid | Charging slowly; the power source is providing limited power |
| Quick red blink, then off | Battery too low to boot |
| Purple, solid | Headset is in the bootloader |
Source: Valve, Reference – Steam Frame LEDs.
A solid yellow light is the most useful one to know. It means your charger is underpowered, which is the usual cause of slow charging. Our Steam Frame battery life guide covers how long a charge lasts in practice.
Step 2: Turn On the Controllers
Press the button with the Steam logo on each controller. According to Valve, the controllers should pair automatically the first time they are turned on and seen by the headset. If a controller does not power on, the Steamworks notes say to check that the tab has been removed from the battery compartment. The controllers switch off on their own after a period without use.
Step 3: Fit the Headset and Set the IPD
Valve’s video suggests putting the headset on eyes-first, especially if you wear glasses, wearing the rear strap slightly high to clear your ears, then tightening the side straps. The pivot arms at the front spread pressure across your face.
- IPD: turn the IPD wheel until the image looks sharp. Valve’s target range is 60 to 70 mm. Once it looks right, use the IPD lock, which sits under the magnetic face gasket near the brow, to hold the lenses in place.
- Glasses: frames up to 140 mm wide fit, per the spec sheet. If your glasses press against the lenses, install the included eye relief spacer: remove the magnetic face gasket, insert the spacer and refit the gasket.
- Prescription inserts: an alternative to wearing glasses. See our VR prescription lens inserts guide for the options.
Step 4: Follow the Guided Tour and Sign In
On first start, the Steam Frame runs a Guided Tour. Valve says it covers signing in to (or creating) a Steam account, pairing the controllers and learning to move around in the headset. You will be asked to join a Wi-Fi network so the headset can sign in and download updates. The Steamworks notes say to complete the initial update, let the headset reboot, then sign in.
Valve’s quick start video describes three ways to sign in:
- Steam Mobile App (recommended): choose Add an Account in the headset. In the app, open the Steam Guard tab, tap the gear icon and select “Sign in to a Steam Frame.”
- QR code: under More Options, choose Scan QR code, then hold your phone camera close to the lens from the app’s Steam Guard tab. Valve admits this is “a weird way to sign in, but it does work.”
- Manual entry: type your account name and password on the virtual keyboard.
If a controller is not working at this stage, press the Aux button on the side of the headset. A cursor appears that follows your head, and the Aux button then acts as a click. Valve’s FAQ says the bundled copy of Half-Life: Alyx is redeemed in Settings after you sign in, and it cannot be redeemed if the game is already in your library.
You can replay the Guided Tour from the Help section of the Quick Access Menu, which opens when you hover over the clock in the VR Dashboard.
Step 5: Install Updates
Valve’s first troubleshooting step for any problem is to update. On the headset, go to Steam Settings > System > Updates in the VR Dashboard. If you plan to stream, update the Steam client and SteamVR on your PC as well.
Owners who want the newest features can switch to the beta channel under Steam Settings > System > System Update Channel. The current beta, SteamOS 0.5.10, arrived on November 19 with higher default streaming resolutions, a display sharpness control and a fix for a hang on the Steam Frame logo at boot after an OS update. Valve describes beta builds as containing “new features that are still being tested,” so stay on the default channel if stability matters more to you. We covered the previous beta in our SteamOS 0.5.9 report.
STEAM FRAME UPDATE
SteamOS 0.5.10 Beta for Steam Frame has released!
-Improved streaming decode performance, allowing for higher default streaming resolutions.
-Added global display sharpness control (defaulting to ON).
-Reduced "green tint" on high frequency greyscale image— Steam Hardware Updates (@HardwareSteam) November 19, 2026
Steam Hardware Updates is an independent fan account, not a Valve account. The patch notes it quotes match Valve’s announcement.
Step 6: Set Up Your Playspace
A Playspace is the clear area you define for play. Open the Playspace menu from the taskbar in the VR Dashboard to draw it again, adjust the floor height or recenter to where you stand. To turn the dashboard to face a new direction, hold the Steam button while facing that way and release it when the icon shows ready.
The Chaperone grid appears when you approach the edge. Change its look under VR Settings > Play Area > Chaperone Style. If you are unsure how much room you need, our explainer on seated, standing and room-scale VR covers the trade-offs.
Tracking uses the headset’s built-in cameras plus sensors and IMU data. If tracking misbehaves, Valve suggests turning off small bright lights such as Christmas lights, removing other sources of infrared interference, covering reflective surfaces, restarting the headset and controllers, and replacing the controller batteries.
Step 7: Pair the Wireless Adapter With Your PC
The included 6GHz adapter gives the headset a direct, low-latency link to your PC that works alongside your home Wi-Fi. Valve says it performs best with a clear line of sight and within about 20 feet of your Playspace.
- Sign in to the same Steam account on the headset and the PC.
- Plug the adapter into the PC, preferably into a USB 3 port.
- Launch SteamVR and accept the prompt to install the adapter driver.
- Select Pair when prompted, then enter the code in the headset using the virtual keyboard.
If no prompt appears, Valve suggests trying a different USB port. The Steamworks notes add three more fixes: reboot the PC so the driver installation takes effect, restart the headset, and confirm that both devices use the same Steam account. You can also pair manually on the headset under Steam Settings > Remote Play > Wireless Streaming Adapter.
| Adapter LED | Meaning |
|---|---|
| Green, blinking | Steam has not taken control of the adapter yet |
| White, slow blinking | Steam is trying to connect to a Steam Frame |
| White, solid | Headset connected and ready to stream |
Source: Valve, Reference – Steam Frame LEDs.
Step 8: Stream a Game or Play Standalone
To stream, open your Steam Library in the headset and choose “Stream from” your PC in the drop-down on the green button. Streaming uses the adapter and your Wi-Fi together. More options sit under Steam Settings > Remote Play on the headset and in the Remote Play settings of the Steam client on the PC. If you see hitching or lag, Valve points to its Network and Wi-Fi Troubleshooting article, which suggests testing another Wi-Fi band and checking your router for congestion or interference.
For standalone play, install a compatible game on the headset from your Library. The Library entry and store page show expected compatibility, and Valve keeps a curated list of Steam Frame Verified games. Our best Steam Frame games of 2026 list is a good place to start. To trade performance for battery life, use the Performance or Playtime presets in the Quick Access Menu.
Linux and Steam Machine Users: Read This First
Valve is direct about the current limits: “Full support for SteamVR and Steam Frame streaming via the wireless adapter are currently available on Windows only.” SteamVR on Steam Machine and desktop Linux “isn’t fully supported at this time,” and Valve warns of possible performance or compatibility issues.
If you want to try anyway, Valve recommends running Steam in Desktop Mode, opting into the SteamVR beta and launching SteamVR manually before starting a VR game. Using the wireless adapter with a Linux PC also requires SteamOS 3.9 or newer, or Linux kernel 7.2 or newer. Valve says it will expand support after launch. We first reported the Windows-only restriction in October in our adapter streaming report.
The headset itself runs SteamOS and includes a full Linux desktop. Open it from the dashboard menu via “+” (Launch Program) > Desktop. The controller acts as a laser pointer, the trigger is a left click and pressing the thumbstick is a right click. Developers can also enable Developer Mode under Steam Settings > System to get ssh, adb and RDP access, according to the Steamworks notes.
Storage, Gamepads and Other Accessories
- Storage: the Frame ships with a 256GB or 1TB SSD. Manage it under Steam Settings > Storage.
- microSD: the slot sits under the magnetic face gasket next to the IPD lock. Cards must be formatted in the headset first. Valve supports any UHS-I card of class 3 or better; UHS-II and UHS-III cards should work, but without their faster speeds. A card already used for a Steam Deck or Steam Machine library should work without extra steps.
- Gamepads: Steam Settings > Controller > Add Controller has guided steps for Steam, PlayStation, Xbox and Switch Pro controllers.
- Bluetooth devices: put the device in pairing mode, then pair it under Steam Settings > Bluetooth.
- Re-pairing a Frame controller: use Steam Settings > Controller > Add Controller. Hold Steam + Menu on the right controller or Steam + View on the left until the LED blinks rapidly.
Care Tips That Protect the Headset
Valve warns that sunlight can permanently damage the display system, even indoors. Store the headset with the lenses turned away from windows and other bright light sources. Clean the lenses with a dry microfiber cloth and light pressure. Valve says a little isopropyl alcohol on the cloth, or an eyeglass or display wipe, is fine occasionally but not for frequent use. Valve lists a safe operating range of 0 to 35°C (32 to 95°F) and humidity up to 85% non-condensing.
The Bottom Line
Most Steam Frame setup problems come from three sources: a headset that was never plugged in to leave shipping mode, a charger below 27W, or a streaming setup on an operating system Valve does not fully support yet. Get those right and the Guided Tour handles the rest. If you are still waiting for your unit, our guide to checking your Steam Frame order window explains the queue, and our Steam Frame vs Quest 3 comparison sets the headset against its main rival.
Sources: Valve, Steam Frame Feature and Troubleshooting Guide (last updated November 3, 2026), Reference – Steam Frame LEDs, Steam Hardware Network and Wi-Fi Troubleshooting, Steamworks: Setting up your Steam Frame for development, Steam Frame spec sheet and FAQ, Getting Started with Steam Hardware and the official Steam Frame quick start video (all checked November 22, 2026); SteamOS 0.5.10 Beta announcement (November 19, 2026); GamingOnLinux (November 20, 2026).