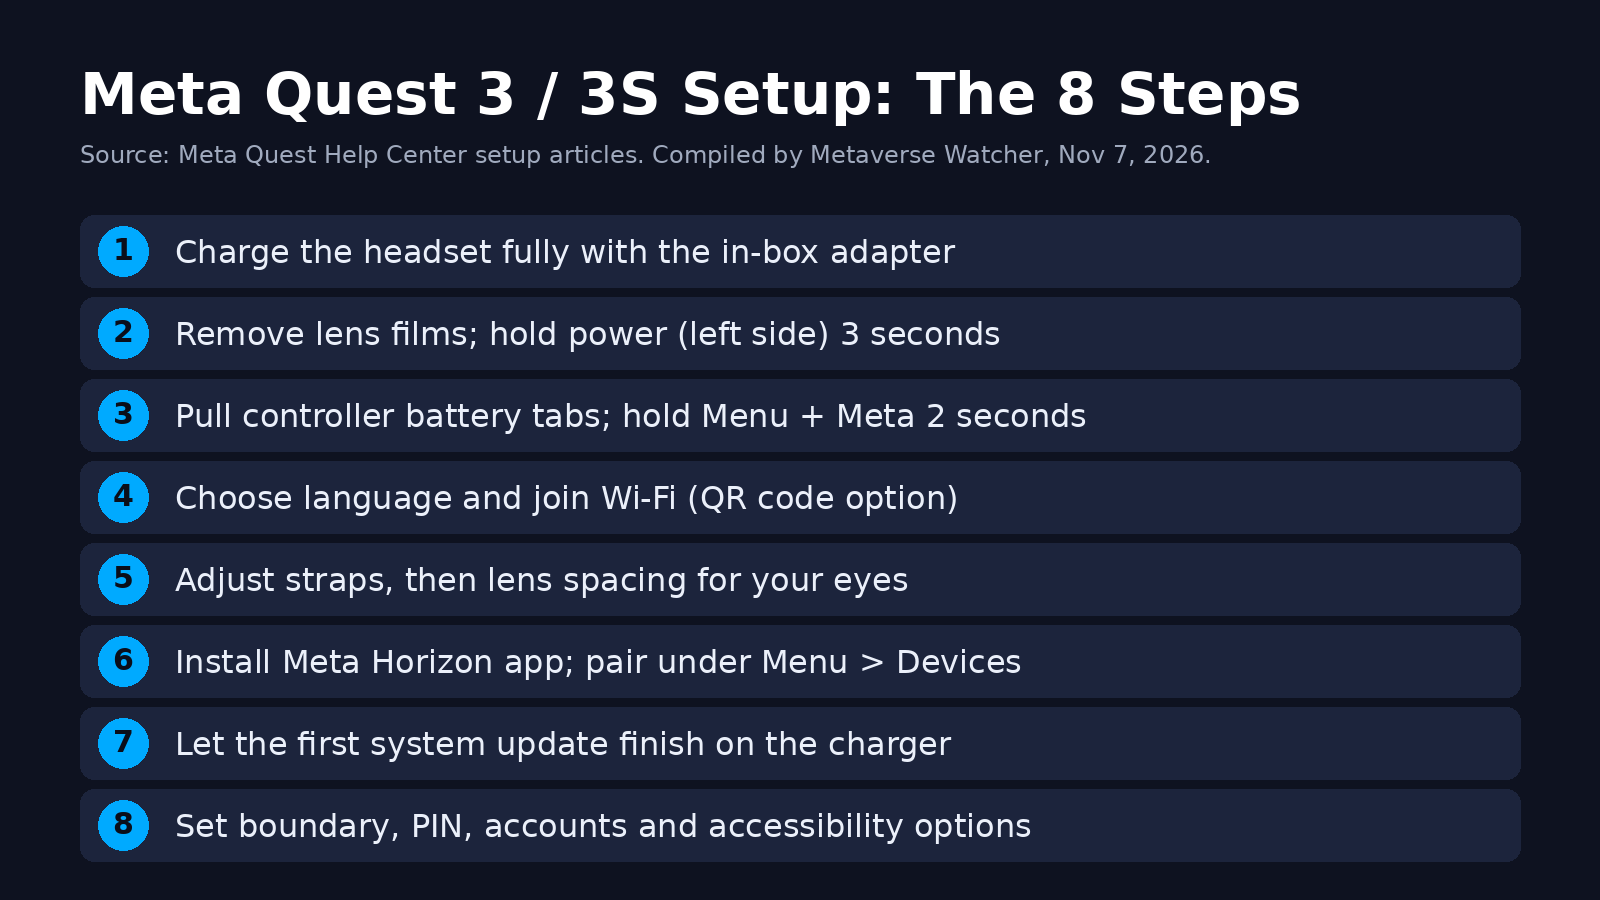
A new Meta Quest 3 or Quest 3S is one of the most common holiday tech gifts, and the first 30 minutes decide whether it becomes a nightly habit or a drawer ornament. The official process is short, but Meta spreads the details across several Help Center articles, and a few steps (the first system update, lens spacing, the account a child should use) are easy to get wrong. This guide puts the whole Meta Quest 3 setup in one place, in the order you will actually meet each screen, based on Meta’s own Quest 3 setup article and Quest 3S setup article, checked on November 7, 2026.
What you need before you start
- A smartphone running iOS 15.1 or later, or Android 5.0 or later. Meta says the Horizon app may not work on tablets, so use a phone.
- Wi-Fi and Bluetooth turned on on that phone. Meta lists both as requirements for pairing.
- Your Wi-Fi password. The headset downloads a system update during setup, so a reliable connection matters.
- A clear play area of at least a couple of steps in each direction if you plan to stand. Our Quest boundary setup guide covers the space each mode needs.
- A Meta account, or about five minutes to create one in the app.
Step 1: Charge the headset first
Meta’s instructions for both headsets start the same way: use the power adapter and cable in the box to FULLY charge the headset before first use. This is not just caution. The first boot triggers a system update, and Meta separately notes that the headset should be connected to a charger before any software update. A headset that dies halfway through its first update is the most common setup headache, and it is completely avoidable. Charging also gives you time to install the phone app (Step 6) while you wait. If you want to know how long a full charge lasts once you are playing, see our Quest 3 battery life guide.
Step 2: Unbox and power on
- Remove the paper wrap from the head strap.
- Peel the protective films off the lenses. Leaving them on is the number one cause of a blurry first impression.
- Press and hold the power button on the left side of the headset for about three seconds, until you hear a chime and see the Meta logo inside.
Step 3: Wake the controllers
Each Touch Plus controller ships with a paper battery blocker. Pull the tab out of each one, then attach the wrist straps and tighten them; the straps exist because an energetic swing can send a controller into a TV. Turn the controllers on by holding the Menu button on the left controller and the Meta button on the right controller for two seconds. A blinking white light and a short vibration mean they are ready. If a controller does not wake or later wanders in space, our controller drift and tracking fix guide walks through the usual causes.
Step 4: Language and Wi-Fi
Put the headset on and the in-headset setup asks for a language and a Wi-Fi network. Typing a long password with a virtual keyboard is tedious, so Meta offers a shortcut: on the “Choose how to connect to Wi-Fi” screen, pick Use a QR code from the Meta Horizon mobile app and the headset scans a code shown on your phone. Meta’s QR code help page recommends holding the phone at eye level. One documented catch: the QR code does not currently support semicolons in network names or passwords. If yours contains one, choose Enter Wi-Fi details on your headset instead.
Step 5: Get the fit and lens spacing right
Fit is where Quest 3 and Quest 3S differ most, and it has more effect on clarity and comfort than any software setting. Loosen the straps, place the headset against your face, pull the strap over the back of your head, tighten the split rear strap, then use the top strap to take weight off your cheeks. You can also tilt the visor up or down on its arms until the image is sharpest.
| Adjustment | Meta Quest 3 | Meta Quest 3S |
|---|---|---|
| Lens spacing (IPD) | Continuous wheel on the bottom left of the headset | Three click positions: 58 mm, 63 mm, 68 mm; slide the lenses by their outer edge |
| Room for glasses | Eye-relief buttons inside the facial interface move the lenses closer or farther | Glasses spacer included in the box |
| Supported IPD range (Meta) | Best for roughly 56 to 70 mm, which Meta says covers about 95% of adults | |
If you know your interpupillary distance (IPD), Meta’s lens spacing guidance for the three-position headsets is simple: 61 mm or smaller uses position 1, 61 to 66 mm uses position 2, and 66 mm or larger uses position 3. If you do not know it, an optometrist can measure it, or you can estimate it with a mirror and a millimeter ruler. On Quest 3, just turn the wheel until text in the menus looks crisp across the whole view, not only in the center.
Glasses wearers should use the eye-relief adjustment (Quest 3) or the spacer (Quest 3S) to keep frames from scratching the lenses. For daily use, prescription inserts are more comfortable; our VR prescription lens inserts guide compares the options for every major headset.
Step 6: Pair with the Meta Horizon app
The phone app, formerly called the Oculus app and then the Meta Quest app, is required for the initial pairing even though you will not need it every session. Meta’s steps:
- Install Meta Horizon from the App Store or Google Play and update it to the latest version.
- Open it and log in, or create a Meta account.
- Tap Menu at the top of the Horizon Feed, then Devices.
- Tap Pair new headset or Add device, choose your headset model, and follow the prompts.
If the app does not offer the option to add a headset, Meta’s advice is to update the app, fully close it, and reopen it. Keep Bluetooth and “sharing with nearby devices” switched on, because that is how the phone finds the headset. After pairing, the app becomes your remote control for the Store: you can buy and remote-install games from your phone while the headset charges.
Step 7: Let the first update finish
After pairing, the headset typically downloads and installs a Horizon OS update and restarts. Leave it on the charger and resist the urge to skip ahead. Once the update is done, the in-headset tutorial continues. Meta notes one useful shortcut here: after the initial update, pressing the Meta button on the right controller three times opens accessibility settings for vision, mobility and hearing, so users who need larger text or other help can turn it on before the tutorial.
Step 8: Boundary, PIN and accounts
Three choices made in the first hour shape how the headset works for the whole household.
- Boundary. Quest 3 and 3S scan the room with their cameras and suggest a play area. Pick roomscale if you have open floor or stationary for seated play. Our seated vs standing vs room-scale guide explains which games need which.
- Unlock PIN. Set one if the headset lives in a shared space. Meta’s Help Center has a separate article on PINs and codes for Horizon and Quest.
- Accounts. The person who pairs the headset becomes its primary account, and purchases follow that account. Meta’s app supports family permissions for children aged 10 to 12 and teens 13 and up. Do not hand a child a headset logged in to an adult account; set up a supervised account instead with our Quest parental controls guide, and use Quest profiles and app sharing so siblings can share games without sharing saves.
Setting up a used or regifted Quest
A secondhand headset may still be tied to the previous owner’s account. Before running the steps above, have the seller remove it from their Meta Horizon app and perform a factory reset; our Quest 3 and 3S factory reset guide covers both the in-app and button-combination methods. A reset erases local game data, so cloud backup should be on before you wipe a headset you already own.
Care tips Meta puts in the setup guide
- NEVER leave the headset in direct sunlight. Meta warns that sunlight through the lenses can permanently damage the display. That includes a windowsill or a car seat.
- Clean lenses and camera plates with a dry optical microfiber cloth only, with no liquids or chemical cleaners.
- Wipe straps and the facial interface with non-abrasive antibacterial wipes, not alcohol. Meta says the Quest 3 facial interface can be hand-washed with mild soap.
- Use compressed air, carefully, for dust in sensors and vents, and store the headset in a case.
What to do in your first week
With setup finished, a few settings changes make a noticeable difference; our Quest 3 best settings guide lists the ones worth changing for sharper image and comfort. New users prone to queasiness should start with seated or stationary games and read our VR motion sickness prevention guide before trying smooth-locomotion titles. To fill the library, start with our best free Quest games and the ranked best Quest 3 games of 2026. When friends want to see what you are doing, cast the Quest to a TV or phone, and if you own a gaming PC, our guide to playing PC VR games on Quest 3 compares Link, Air Link and Steam options.
Quick troubleshooting
| Problem | What to try |
|---|---|
| Image is blurry | Confirm the lens films are off, then adjust lens spacing and visor tilt; clean lenses with a dry microfiber cloth. |
| Phone app will not find the headset | Update and fully restart the Meta Horizon app; turn on Bluetooth and nearby-device sharing; keep the phone close. |
| Wi-Fi QR code will not scan | Hold the phone at eye level; if the network name or password has a semicolon, type the details in the headset. |
| Controllers do not light up | Make sure the battery blocker tabs are removed, then hold Menu plus Meta for two seconds. |
| Update stalls or headset shuts off | Connect the charger and let the update complete before continuing. |
Still deciding which headset to give? Our Meta Quest 3 vs Quest 3S comparison covers the real differences, and our ranked Quest 3 accessories list covers the straps, cases and batteries worth adding. If setup still fails after these steps, Meta Store Support is the official route for hardware faults.